Java Tutorial
Chapter 3 – Writing first Java program in Eclipse
Hello and welcome back to the Java tutorial series. In this previous chapters we got an Introduction to Java and had setup the Java development environment and running a sample program.
As we mentioned in the previous chapter, Professional Java Developers use an IDE to write their programs. IDE stands for Integrated Development Environment, which is a Software tool used to write and run your programs within the IDE itself. It helps to manage the software application project folders in a professional manner.
Some of the popular IDEs currently in use are Eclipse, NetBeans, Visual Studio Code, IntelliJ IDEA, etc. In this tutorial, let us learn how you can create and run your first hello world program in Java using Eclipse IDE.
So, let’s get started…
Download the latest version of Eclipse IDE. Here is the link to their Downloads page.
Visit the download page, select your OS version and proceed to download the installer. Once the installer or the executable binary files are downloaded in your local system, you can run it to install Eclipse in your system.
Once installed, start Eclipse IDE.
Once Eclipse is launched, Click on File menu > New > Java Project
You will be displayed a dialog box to create a new Java project as shown below:
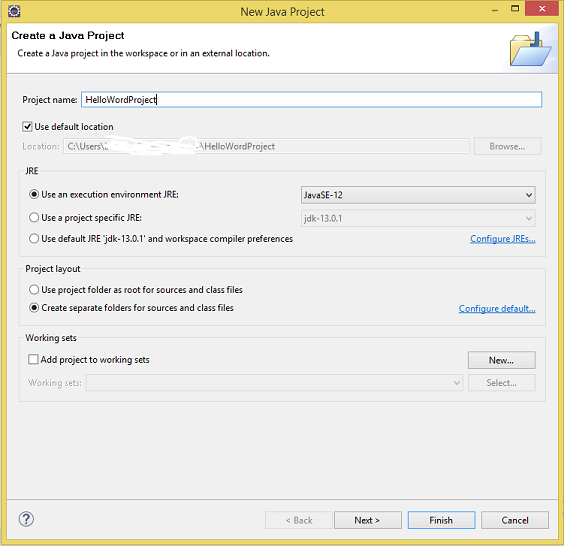
Enter the necessary details such as: Project Name: HelloWorldProject,
Leave the rest of the configuration as it is, click on Next button and subsequently click on “Finish” button.
You will find a new folder created and displayed on the left sidebar of Eclipse IDE as shown below:

Locate the folder titled “src” in the newly created project folder structure. Right click on this folder, and click New > Package.
You will be displayed a dialog box to create a New Java Package as shown below:
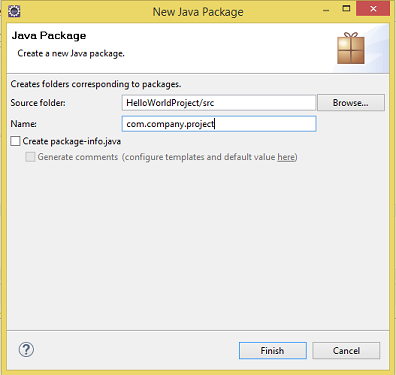
Enter the details such as:
Name: com.yourcompanyname.projectName
This is the standard convention followed to write the package name (i.e. top level domain, then company domain, and then the project name). You can replace the above package name with your company or college name and the project name. Once done, click on “Finish” button.
Bonus Tip:
A shortcut to remember this convention is the package name should be the reverse of the website URL name of the application. E.g. if the application will be hosted at “application1.abccompany.com”, the package name can be given as “com.abccompany.application1”.
You should be able to see the newly created package within the project folder structure. Right click on the package name and click on New > Class.
You will be displayed a new dialog box prompting to Create a new Java Class as shown below:
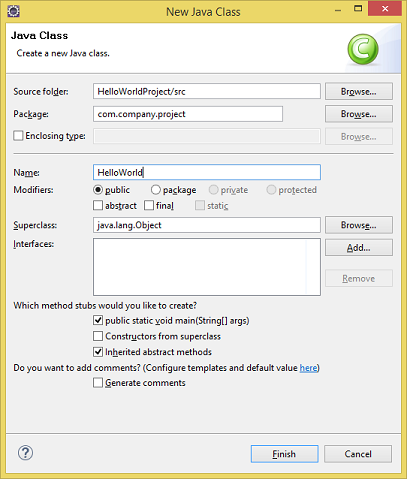
Enter the name as “HelloWorld”, keep the rest of the fields as it is.
Select the checkbox titled “public static void main(String[] args)” to check the checkbox.
Click on Finish button to create the Java class file.
You should be able to locate the newly created Java class file inside the package titled as “HelloWorld.java”. Double click on the file to open it on the center panel of the Eclipse IDE. You should be able to locate some pre-generated code like this:
package com.comp.name1;

public class HelloWorld {
	public static void main(String[] args) {
		// TODO Auto-generated method stub

	}
}
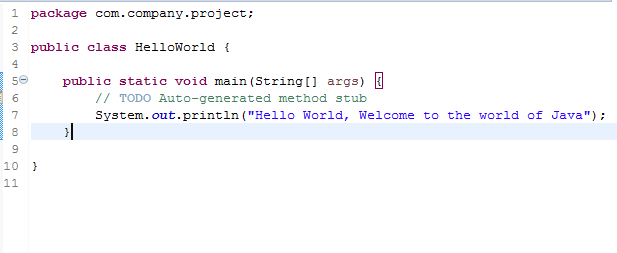
Add the below line of code inside the “main” method:
System.out.println(“Hello World, Welcome to the world of Java”);
Your final code should be like this:
Go to the top menu bar. Click on Run menu > Run.
You should see the project getting quickly compiled and executed. The output will be displayed in the “Console” tab in the footer area of the Eclipse IDE.
Congratulations, you just ran your first Hello World program in Java.
The above steps may appear long but these are just one time setup. Once you have created your project, you just need to add your new incremental Java class files to the packages within the same project.
I hope this tutorial was useful. See you in the next tutorial to explore Java language fundamentals.
Next Chapter Chapter 4 - Java Basic Syntax
Sign up for DigitalOcean Cloud
Get FREE $200 credits, deploy your hobby projects for Free

Sign up for Hostinger Cloud or VPS plans and get upto 20% Discount